Elden Ring gives you enormous freedom from the moment you enter the Lands Between. You can travel almost anywhere, but the game offers little guidance on which challenges are appropriate for your current strength.
Progression is not meant to be linear. Instead, success depends on recognizing when a fight is fair and when it is better to explore elsewhere, improve your build, and return later. Players who struggle often do so because they encounter bosses far earlier than intended.
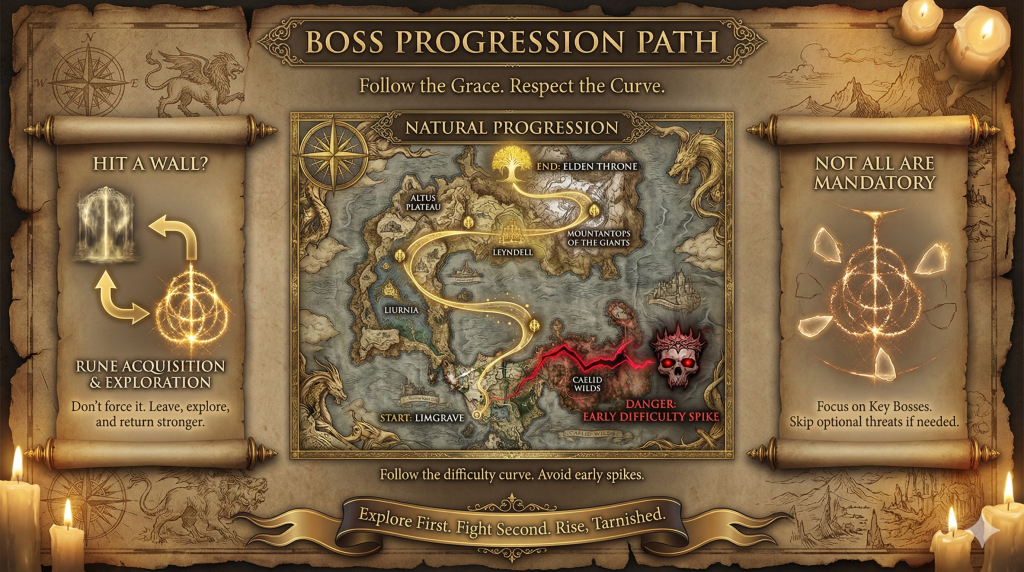
This guide presents a structured progression path that follows the game’s natural difficulty curve. By organizing major bosses by region and recommended power level, it helps you choose your next objective with confidence while preserving the freedom that defines the experience.
Key Takeaways
- You are not expected to defeat every boss to complete the main story.
- Progression follows a difficulty curve, not a fixed route.
- Early exploration and leveling matter more than rushing main objectives.
- Certain regions are intentionally tuned for later stages of the game.
- Defeating key bosses unlocks access to new areas rather than ending progression.
- If a fight feels overwhelming, leaving to explore elsewhere is part of the intended design.
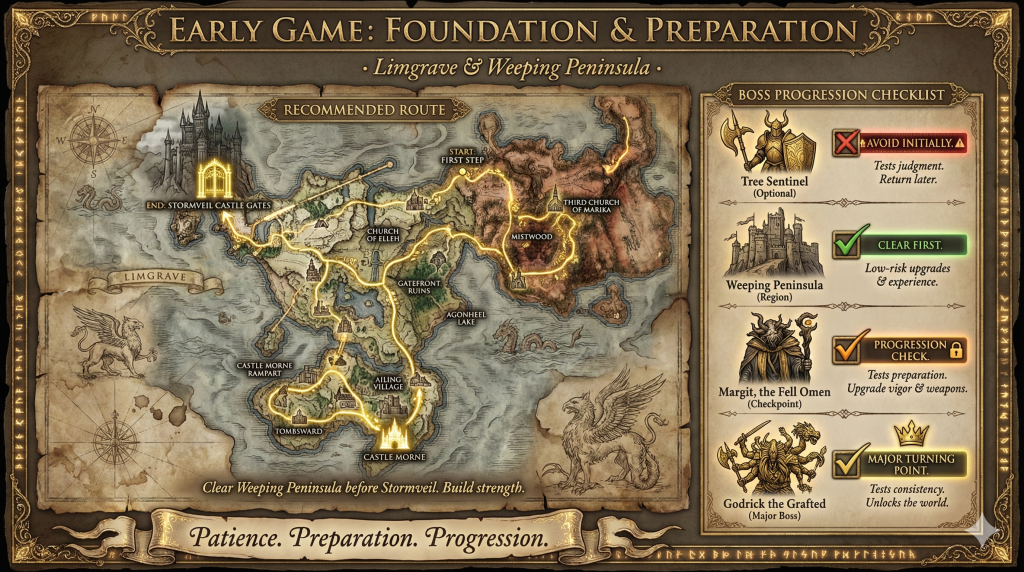
Early game: Limgrave and the Weeping Peninsula
Limgrave functions as the game’s opening test, but its design is intentionally misleading. While it appears open and inviting, many enemies in the central fields are tuned to punish underleveled characters.
Early success comes from resisting the urge to rush Stormveil Castle. Exploring smaller dungeons, ruins, and side paths allows you to gather upgrade materials, improve your flask, and learn combat fundamentals without overwhelming pressure.
The Weeping Peninsula, located south across the Bridge of Sacrifice, is designed as a low-risk extension of Limgrave. Clearing this area first provides steady experience gains and prepares you mechanically and statistically for the challenges ahead.
The Tree Sentinel
The Tree Sentinel is one of the first enemies you encounter in Elden Ring, and it is intentionally overwhelming. This encounter exists to communicate a core principle of the game: not every challenge is meant to be faced immediately.
Rather than testing reflexes, the Tree Sentinel tests judgment. Sneaking past him allows you to access early points of interest and begin building strength without unnecessary risk.
Returning later, once you have upgraded your weapon and acquired Torrent, transforms the fight into a fair challenge. The lesson is clear. Progression in Elden Ring rewards patience and timing more than stubborn persistence.
The Weeping Peninsula
The Weeping Peninsula is designed as a low-pressure extension of Limgrave. Its enemies are more forgiving, and its layout encourages exploration without constant punishment.
Spending time here allows you to gather upgrade materials, improve your flasks, and experiment with combat styles. These gains translate directly into survivability, especially for players still learning enemy patterns and stamina management.
Clearing Castle Morne at the southern edge of the peninsula serves as a practical milestone. By the time you leave this region, you should feel more comfortable with both your build and the game’s combat rhythm, making the transition to Stormveil Castle far more manageable.
Margit, the Fell Omen
Margit guards the entrance to Stormveil Castle and serves as the game’s first true progression checkpoint. This fight is designed to test whether you have explored enough, upgraded your equipment, and learned the fundamentals of combat.
Struggling against Margit usually indicates missing preparation rather than poor execution. Low vigor, unupgraded weapons, or limited flask upgrades all make this encounter far more punishing than intended.
Returning after further exploration often changes the outcome dramatically. When Margit becomes manageable, Stormveil Castle will feel demanding but fair, which is the intended difficulty curve for this stage of the game.
Godrick the Grafted
Godrick represents the first major turning point in your journey. As the Shardbearer ruling Limgrave, defeating him confirms that your character is strong enough to move beyond the opening regions.
This fight tests everything you have learned so far, including stamina management, spacing, and adapting to multi-phase encounters. Compared to Margit, Godrick is more forgiving but demands consistency rather than bursts of aggression.
Defeating Godrick grants his Great Rune and unlocks access to the broader world beyond Limgrave. More importantly, it signals that you are ready to explore new regions with confidence rather than caution.
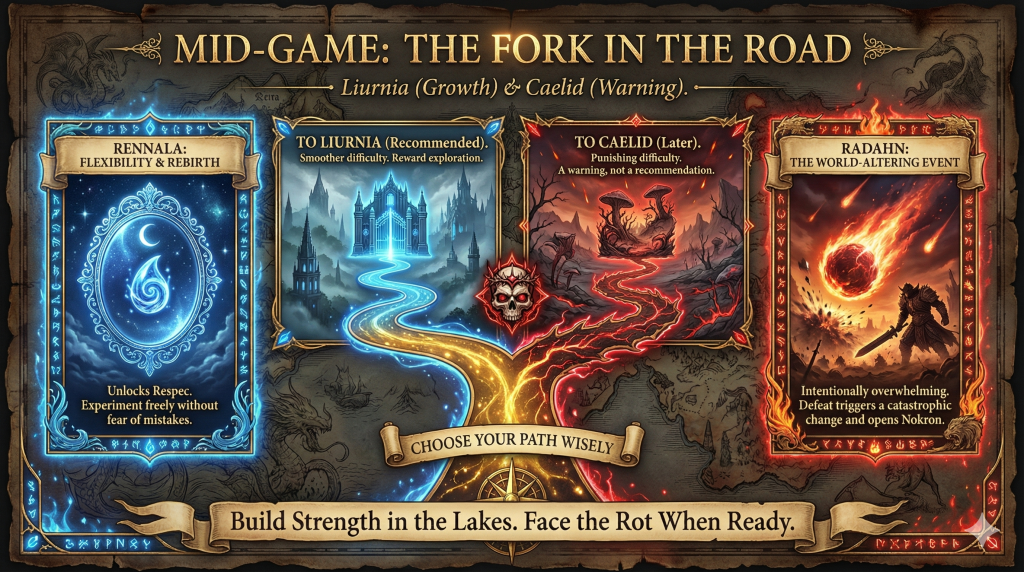
Mid-game: Liurnia of the Lakes and Caelid
After Stormveil Castle, the game opens into two vastly different regions. Liurnia of the Lakes offers a smoother continuation of the difficulty curve, while Caelid introduces enemies tuned for much later progression.
Liurnia is designed to reward exploration and experimentation. Its enemies are manageable, its dungeons reinforce core mechanics, and its central legacy area builds naturally on the skills developed in Limgrave and Stormveil.
Caelid, by contrast, exists as a warning rather than a recommendation. While it is technically accessible, its enemies punish low vigor, poor positioning, and under-upgraded weapons. Clearing Liurnia first allows you to approach Caelid as a challenge rather than a roadblock.
Rennala, Queen of the Full Moon
Rennala sits at the center of Liurnia and represents a shift in how you can approach your character build. Defeating her does not block or unlock new regions, but it fundamentally changes how flexible your progression becomes.
This encounter is less about raw difficulty and more about preparation. Once defeated, Rennala allows you to respec your character by trading Larval Tears, giving you the freedom to adjust stats if an early build choice no longer feels effective.
For many players, this is where experimentation becomes safe. Clearing Rennala removes the pressure of permanent mistakes and encourages exploration of new weapons, spells, and playstyles as the game’s challenges increase.
Starscourge Radahn
Starscourge Radahn marks one of the game’s most significant turning points. While technically optional, defeating him permanently alters the world and unlocks major progression paths tied to exploration and questlines.
This encounter is intentionally overwhelming. The Radahn Festival allows you to summon multiple allies, signaling that the fight is designed around coordination and attrition rather than traditional dueling. Attempting this battle too early often results in instant deaths rather than meaningful progress.
Waiting until your character has sufficient vigor, weapon upgrades, and survivability transforms the fight from chaotic to manageable. Defeating Radahn triggers a catastrophic event that opens access to Nokron, Eternal City, making him less a gatekeeper and more a catalyst for the next phase of the game.
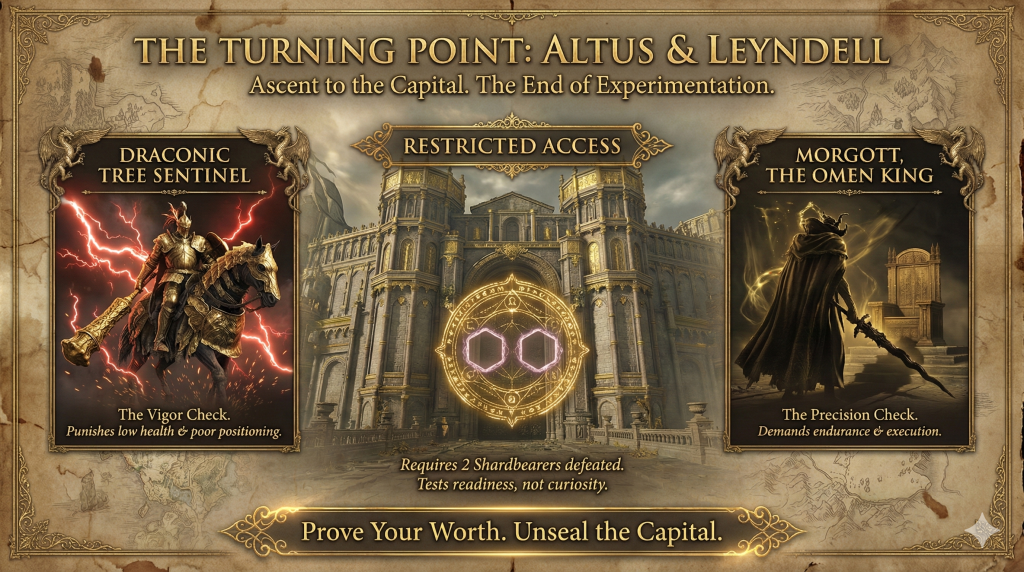
The turning point: Altus Plateau and Leyndell
Reaching the Altus Plateau signals a clear shift in the game’s expectations. By this point, you are expected to understand your build, manage stamina efficiently, and survive sustained encounters rather than isolated fights.
Accessing Altus requires deliberate progress, either by activating the Grand Lift of Dectus or climbing the Ruin-Strewn Precipice. Both paths exist to ensure your character has gained enough strength and experience before advancing.
Leyndell, the Royal Capital, represents a convergence of everything learned so far. Its narrow paths, powerful enemies, and layered vertical design punish careless movement. Entry is restricted to players who have defeated two Shardbearers, reinforcing that this area is meant to test readiness, not curiosity.
Draconic Tree Sentinel
The Draconic Tree Sentinel exists to test whether you are ready for the Royal Capital. Unlike earlier encounters, this fight demands consistent defense, awareness of wide-area attacks, and patience under pressure.
His lightning-based abilities punish poor positioning and low survivability. If your vigor is underdeveloped or your weapon upgrades are lacking, this encounter quickly becomes overwhelming. That difficulty is intentional rather than punitive.
Defeating the Draconic Tree Sentinel confirms that your build can withstand the sustained damage and tighter combat spaces found inside Leyndell. If the fight feels unmanageable, it is a clear signal to strengthen your character before advancing.
Morgott, the Omen King
Morgott represents the culmination of lessons introduced much earlier in the game. As the true identity behind Margit, this encounter revisits familiar mechanics but demands far greater precision and endurance.
His attacks are faster, his pressure is constant, and mistakes are punished more severely. The fight tests your ability to maintain spacing, manage stamina, and respond calmly under sustained aggression rather than relying on short damage windows.
Defeating Morgott unlocks the path to the Mountaintops of the Giants and signals the transition into the game’s final phase. From this point forward, enemies are tuned for fully developed builds and consistent execution rather than experimentation.
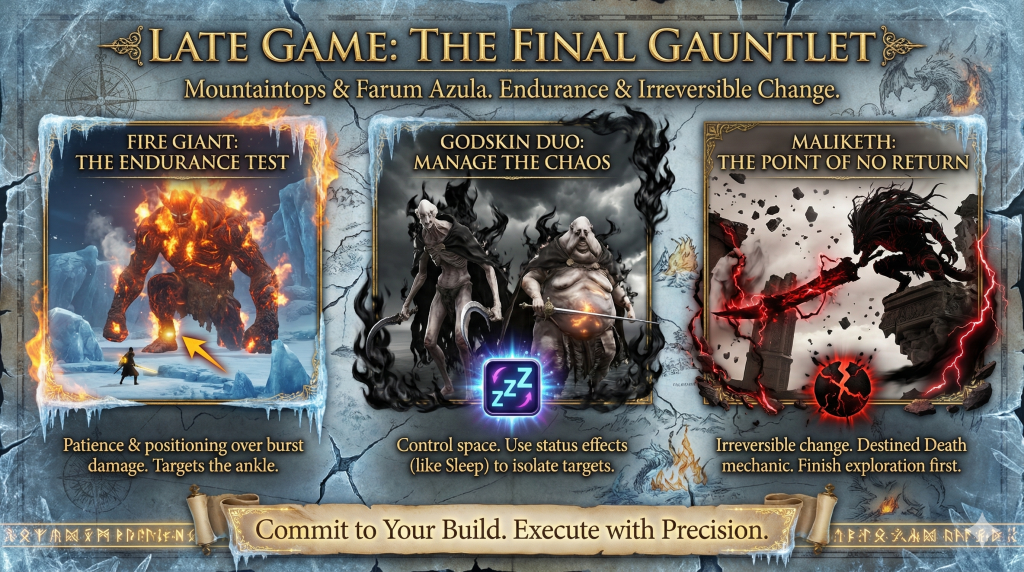
Late game: Mountaintops and Farum Azula
The Mountaintops of the Giants mark a dramatic shift in enemy tuning. From this point onward, encounters are designed around fully upgraded weapons, higher vigor investment, and tighter execution.
Enemies hit harder, recover faster, and leave fewer safe openings. Exploration remains important, but careless movement and underdeveloped builds are punished quickly. This phase of the game assumes you have committed to a primary weapon and refined your playstyle.
Crumbling Farum Azula continues this escalation. Its enemies demand spatial awareness, patience, and stamina control in confined spaces. Together, these regions prepare you for the game’s final challenges by enforcing consistency rather than experimentation.
Fire Giant
The Fire Giant is designed as a test of endurance rather than aggression. His massive health pool and wide attack patterns reward patience, positioning, and sustained focus over burst damage.
In the first phase, targeting his injured ankle creates controlled openings without unnecessary risk. As the fight progresses, safe positioning becomes more important than maximizing damage, especially as his attacks grow larger and less predictable.
Defeating the Fire Giant unlocks the Forge of the Giants and permanently alters the world. This encounter serves as a clear transition point, signaling that the game is moving from open-ended exploration into irreversible endgame progression.
The Godskin Duo
The Godskin Duo is designed to break single-target habits. Fighting two aggressive bosses at once forces you to manage space, control tempo, and limit how many threats you face at any given moment.
Both enemies share a single health pool, which means eliminating one does not end the fight. If pressure is not controlled, the remaining boss will respawn its partner, turning the encounter into a cycle of attrition rather than progress.
This fight rewards preparation and restraint. Status effects such as Sleep can temporarily remove one enemy from the encounter, allowing you to regain control and focus damage safely. Approaching the fight methodically, rather than aggressively, turns chaos into structure.
Maliketh, the Black Blade
Maliketh represents a permanent turning point in Elden Ring. Defeating him advances the story beyond a point where certain locations and items can no longer be accessed.
His attacks apply Destined Death, which drains health over time and temporarily reduces maximum HP. This mechanic punishes careless trading and rewards precise timing, spacing, and defensive awareness rather than raw damage output.
Once Maliketh falls, Leyndell is transformed and the game enters its final phase. Before engaging this fight, it is wise to complete unfinished exploration and optional content, as progression from here becomes linear and irreversible.
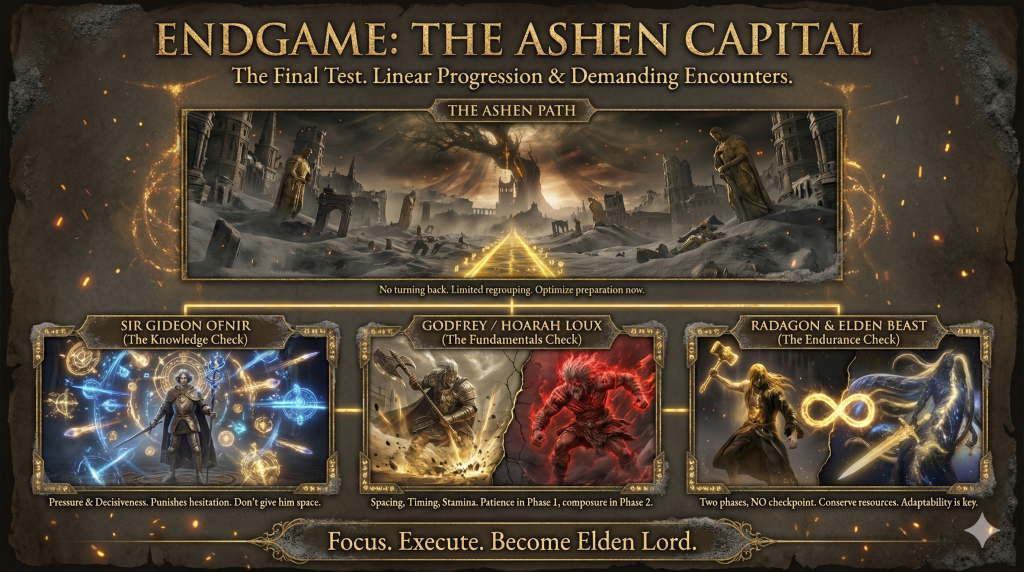
Endgame: The Ashen Capital
After Maliketh’s defeat, you return to Leyndell to find it buried beneath ash. This transformation marks the beginning of the game’s closing act, where exploration gives way to a focused, linear progression.
From this point forward, challenges are designed to be faced in sequence. The Ashen Capital funnels you toward a series of demanding encounters that test consistency, resource management, and composure more than experimentation or exploration.
Because opportunities to regroup are limited, preparation matters more than ever. Ensuring your flasks, equipment, and talismans are optimized before advancing helps reduce fatigue and mistakes as you approach the final confrontations.
Sir Gideon Ofnir
Sir Gideon Ofnir functions differently from most endgame bosses. Rather than testing endurance or mechanical precision, this encounter rewards pressure and decisiveness.
Gideon relies heavily on casting powerful sorceries and incantations. Allowing him space turns the fight into a dangerous battle of attrition, while staying close and applying constant pressure limits his ability to control the encounter.
This fight serves as a knowledge check rather than a raw skill test. Players who recognize casting windows and interrupt patterns will find the encounter far more manageable than those who hesitate or disengage.
Godfrey, First Elden Lord (Hoarah Loux)
Godfrey stands as the final test of core combat fundamentals. This encounter strips away complexity and focuses on spacing, timing, and stamina discipline.
In his first phase, Godfrey uses deliberate melee attacks and ground-shaking stomps that reward patience and controlled movement. Jumping over shockwaves and choosing safe punish windows are more effective than attempting to trade damage.
At half health, he abandons restraint and fights as Hoarah Loux. This phase is faster and more aggressive, built around grabs and relentless pressure. Success here depends on composure and clean dodges rather than damage output. Mastering this fight confirms you are ready for the game’s conclusion.
Radagon and the Elden Beast
The final encounter is structured as a single endurance test split into two distinct phases. There is no checkpoint between Radagon and the Elden Beast, which makes consistency and resource management more important than aggressive damage output.
Radagon emphasizes precision and timing. His wide-reaching holy attacks punish impatience, and prolonged fights reward clean execution rather than risky trades. Learning his attack patterns allows you to conserve healing for what follows.
The Elden Beast shifts the challenge toward adaptability. Its mobility forces you to reposition constantly while avoiding large-area attacks. This phase tests stamina management and composure rather than mechanical complexity. Together, these fights measure your ability to maintain focus across a long encounter rather than peak performance in short bursts.
Conclusion
Although the Lands Between allow complete freedom, progression in Elden Ring follows a clear difficulty curve. Moving through regions in a measured order ensures that each major encounter feels demanding but fair rather than overwhelming.
Understanding when to advance and when to explore elsewhere is more important than following a strict checklist. Bosses are designed to signal readiness, not block progress permanently, and disengaging is often the correct response.
By approaching the game through informed decisions rather than forced progression, you maintain control over both difficulty and pace. This path preserves the game’s sense of discovery while reducing unnecessary frustration, allowing each victory to reflect preparation rather than luck.
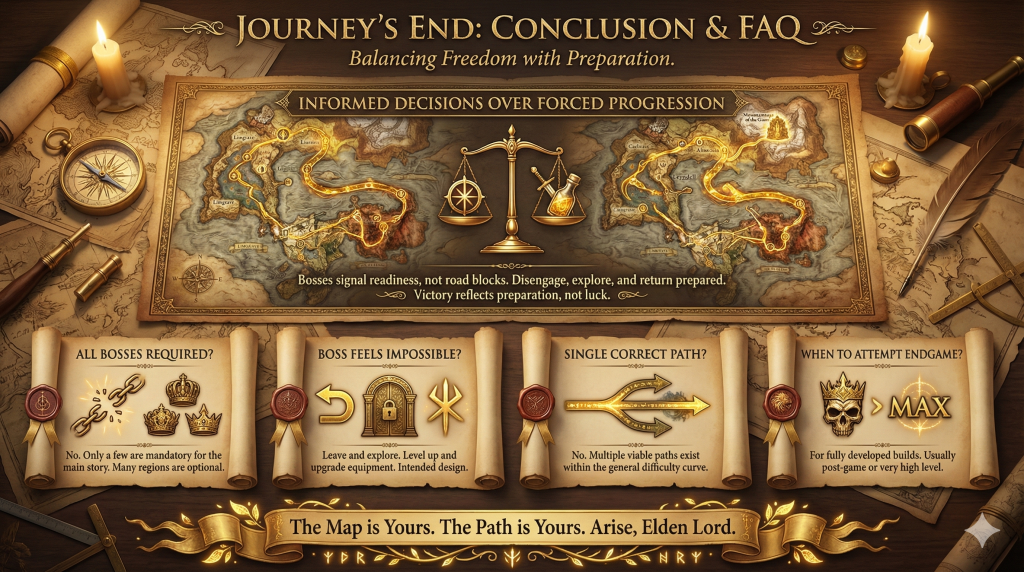
Frequently Asked Questions
Do you have to defeat every boss to finish Elden Ring?
No. Only a small number of bosses are required to complete the main story. Many regions, including large portions of Caelid and optional legacy dungeons, can be skipped entirely if your goal is to reach the ending.
What should you do if a boss feels impossible?
Leaving to explore elsewhere is part of the intended design. Gaining levels, upgrading weapons, or improving flasks often turns an overwhelming fight into a manageable one without requiring mechanical perfection.
Is there a single correct boss order?
No. While the game follows a general difficulty curve, multiple paths remain viable depending on your build, experience, and exploration choices. A recommended order exists to reduce frustration, not to restrict freedom.
When should you attempt optional endgame bosses like Malenia or Mohg?
Optional endgame bosses are designed for fully developed builds and high survivability. Most players attempt them after completing the main story or reaching a high level with fully upgraded weapons.


0 Comments